
MySQL and phpMyAdmin
Overview
 |
This User Guide is designed to help you install MySQL and phpMyAdmin on your Server, and to do some minor configuration. This User Guide is not intended to be a tutorial on how to use MySQL. You will need to consult the official MYSQL documentation or any of the several available books about MySQL if you need to come up to speed on how to actually use the database. |
If you are using CentOS 7, your Server will use MariaDB by default, unless you are using a CentOS 7 template that specifically has MySQL in the template name.
If you are using a CentOS 7 template and need to install MySQL, you will need to use the official MySQL Community repository or a third party repository. Instructions for adding the MySQL Community repo are here - A Quick Guide to Using the MySQL Yum Repository.
More information about MariaDB can be found in the MariaDB User Guide, which also links to the official MariaDB documentation.
Installing MySQL and related applications
Installing MySQL and related applications using the command line
Creating databases and database users
Creating databases using phpMyAdmin
Creating databases and users using the command line
Importing content to a MySQL database
Importing content using phpMyAdmin
Importing content using the command line
Stopping and starting MySQL
Stopping and starting MySQL using the command line
MySQL Configuration
Using a my.cnf file
Sample my.cnf configurations
Backing up your MySQL databases
Backing up your databases using phpMyAdmin
Backing up your databases using mysqldump
Installing MySQL and related applications
To use MySQL you will need to install the MySQL database. You can also install phpMyAdmin to manage the database from a GUI application. If you are going to use phpMyAdmin, you will need to install PHP first, and then phpMyAdmin. If PHP is not installed, the installation of phpMyAdmin will fail.
If you are going to use MySQL with an application like WildFly, JBoss, Tomcat, or GlassFish, you will also want to install MySQL Connector/J.
Installing MySQL and related applications using the command line
MySQL and PHP can be installed from the command line of the Server using yum. To install applications using yum you will need to be able to connect to the Server using SSH and work as the root user.
NOTE - if you are installing MySQL on a CentOS 7 template, see the section below: Installing MySQL on CentOS 7
- MySQL - install MySQL using the
yum install -y mysql-servercommand
| [root@eapps-example ~]# yum install -y mysql-server |
- PHP - install PHP using the
yum install -y phpcommand
| [root@eapps-example ~]# yum install -y php |
- phpMyAdmin - install phpMyAdmin after installing PHP using the
yum install -y phpMyAdmincommand
| [root@eapps-example ~]# yum install -y phpMyAdmin |
Installing MySQL on CentOS 7
If you are using a CentOS 7 template and need to install MySQL, you will need to use the command line and install from the official MySQL Community repo or another third-party repo of your choice. Instructions on adding the MySQL Community repo are here - A Quick Guide to Using the MySQL Yum Repository.
Once you have added the Community repo, you will be able to install MySQL and related applications using the commands from Installing MySQL and related applications.
If you are installing phpMyAdmin, make sure install that from the command line also.
Configuring phpMyAdmin
Depending on which template you used to create your Server, you may also need to install one or more PHP extensions, usually the mcrypt extension, and sometimes the mysql extension and the mbstring extension. You will know which extensions that you need to install by the errors or warning messages you get when trying to access phpMyAdmin. The method to install PHP extensions will vary by what Control Panel you are using.
Once you have installed the required PHP extensions, log out of phpMyAdmin and log back in.
Creating databases and database users
MySQL databases can be created from the phpMyAdmin, and the command line.
Creating databases using phpMyAdmin
phpMyAdmin is a browser based application that will allow you to manage your MySQL databases. To use phpMyAdmin, PHP must be installed.
|
phpMyAdmin is a very powerful application, and it is impossible to cover all aspects of it in this User Guide. If you need assistance with phpMyAdmin beyond creating a user or a database, you will need to refer to the official documentation, found on the phpMyAdmin home page - https://www.phpmyadmin.net/home_page/docs.php |
Connecting to phpMyAdmin
To connect to phpMyAdmin, go to https://example.com/myadmin/, substituting your domain name or server IP address for example.com. 
-
Username - to create a database, log in as the MySQL root user (this is not the same as the system super user)
-
Password - you will need to use the MySQL root password to log in to phpMyAdmin:
Creating a new database and database user
Once you have logged in to phpMyAdmin, click on the Databases tab. This shows all the existing databases, and the Create new databasetext box where you can enter the name of the new database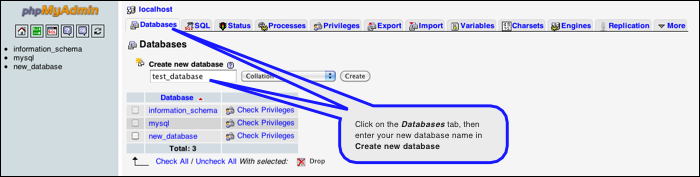
Once you have entered the database name, click on Create. This will create the database, which will be shown in the list of databases in both the left navigation pane and just below the Create new database text box.
To create a user for the new database, click on Check Privileges to the right of the new database in the list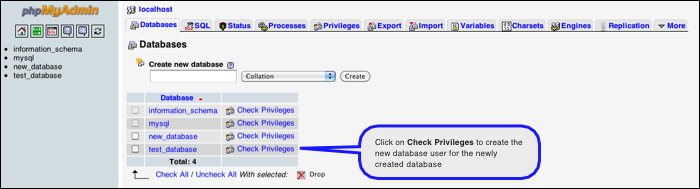
This actually takes you to the Privileges tab, which shows all the users who can access the new database.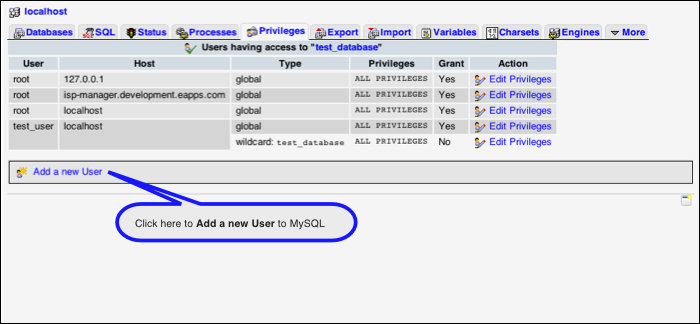
To add a new user, click on Add a new user.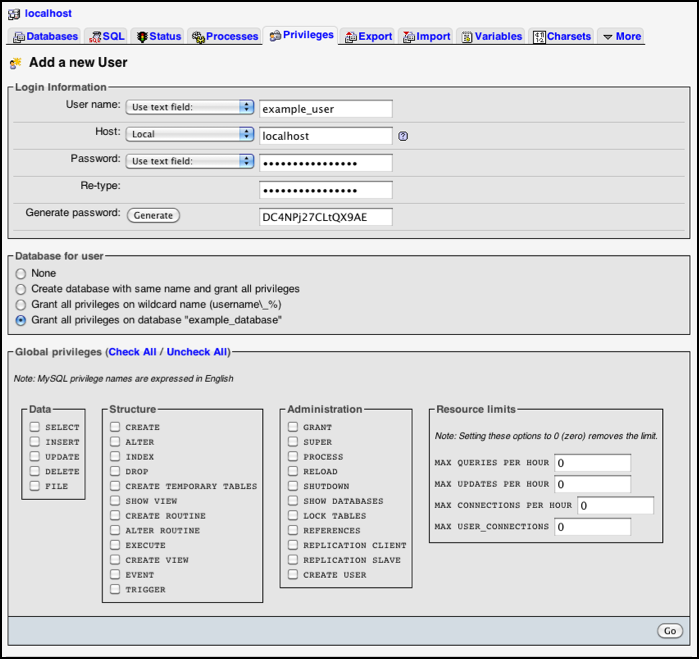
Login Information
-
User name (Use text field): - enter the username for this database
-
Host (Any host): - choose localhost from the drop down list
-
Password (Use text field): - enter a password for the new user
-
Re-type: - retype the password to confirm
-
Generate Password – click on Generate to have phpMyAdmin generate a password for you if you wish
Database for user
- Select "Grant all privileges on database name_of_database" where the database name is the one you just created.
Global privileges
- This allows the user global privileges to the database server. Check or uncheck these as your needs require.
Once you have added your new user and set the database and privileges, click Go in the bottom right corner of the screen. This will create the new user for the database.
Creating databases and users using the command line
To add a MySQL database and user from the command line, you will first need to connect to the command line of the Virtual Server.
From the command line, connect to MySQL using the mysql -uroot -p command. You will need to know the MySQL root password, which can be found in the /root/.my.cnf file.
| [webadmin@example ~]$ mysql -uroot -p Enter password: Welcome to the MySQL monitor. Commands end with ; or . Your MySQL connection id is 108 Server version: 5.1.57 MySQL Community Server GA (GPL) by eApps.com Hosting Copyright (c) 2000, 2010, Oracle and/or its affiliates. All rights reserved. This software comes with ABSOLUTELY NO WARRANTY. This is free software, and you are welcome to modify and redistribute it under the GPL v2 license Type 'help;' or '' for help. Type '' to clear the current input statement. mysql> |
Create the new database
Create the new database using the create database db_name command.
| mysql> create database example_database; Query OK, 1 row affected (0.00 sec) mysql> |
Create the database user
Create a user that can access this database, along with a password for that user. The command to use will look like this:
GRANT ALL ON example_database.* TO example_user@localhost IDENTIFIED BY "examplepass"; (You will have to substitute your database name and your own database user and password)
| mysql> GRANT ALL ON example_database.* TO example_user@localhost IDENTIFIED BY "examplepass"; Query OK, 0 rows affected (0.00 sec) mysql> |
Test the new database user
Exit MySQL with the quit command, and then try to log in with the new user and password you just created.
| mysql> quit Bye [webadmin@example ~]$ mysql -uexample_user -p Enter password: Welcome to the MySQL monitor. Commands end with ; or . Your MySQL connection id is 110 Server version: 5.1.57 MySQL Community Server GA (GPL) by eApps.com Hosting Copyright (c) 2000, 2010, Oracle and/or its affiliates. All rights reserved. This software comes with ABSOLUTELY NO WARRANTY. This is free software, and you are welcome to modify and redistribute it under the GPL v2 license Type 'help;' or '' for help. Type '' to clear the current input statement. mysql> |
Importing content to a MySQL database
There are several methods available to upload or import data into a MySQL database. Data can be imported from the command line or uploaded through phpMyAdmin.
|
All of these examples assume that you have a valid MySQL dump file in .sql format to upload or import |
Importing content using phpMyAdmin
To import a MySQL dump file in .sql format from phpMyAdmin, login to phpMyAdmin with the database username and password of the user who owns the database. Click on the name of the database where you want to import your content, and once that screen loads, click on the Import tab.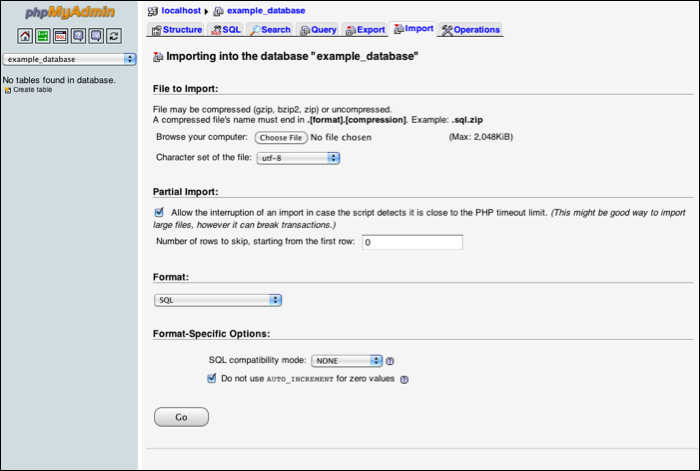
-
File to Import: - click Choose File to browse your computer for the file to upload. Notice the information about the file compression options and the format of the file name. Be aware that by default the maximum size file that phpMyAdmin can upload is 2048KiB, or 2 MB. See below for how to change that.
-
Partial Import: - this allows the import of the file to be interrupted if a PHP timeout might happen. Check or uncheck this as your needs require.
-
Format: - choose the format from the drop down menu that matches the type of file you are trying to import. SQL is the default, and is used for any .sql files.
-
Format-Specific Options: - choose the options that you need. Click the question marks (?) for each option to see the documentation specific to it.
Once you have chosen your file and made the other selections, click Go to import the file into the database.
If your SQL file is larger than 2 MB, you will need to change the value for File minimum size in the PHP configuration. 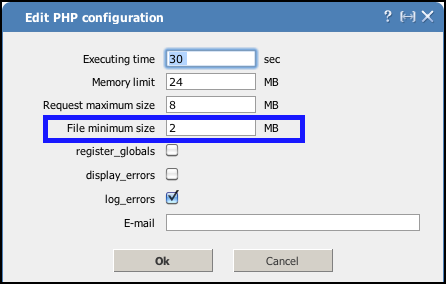
Change the value for File minimum size to be 5 MB larger than your SQL file, and click OK. This makes changes to the /etc/php.ini file, and restarts the Apache web server.
Importing content using the command line
This example assumes you are familiar with working from the Linux command line, and can easily navigate the file system using standard Linux commands. There is no file size restriction on a MySQL dump file that is being imported from the command line (other than the disk size limitations of your Server).
See the User Guide - Connecting to your Server (SSH) - https://sive.host/knowledgebase/196/Securely-Connecting-to-Your-Server-SSH-and-Console.html for more information on how to connect to your Server. The user you connect with to the Server is not important, what is important is that you import the database as the correct database user.
In this example, a MySQL dump file in sql format called example.sql is being imported to the example_database, which is owned by the example_user database user.
The command to use will look like this: mysql -u db_user -p db_name < file.sql
| [webadmin@example ~]$ mysql -u example_user -p example_database < example.sql Enter password: passwd [webadmin@example ~]$ |
To verify that the content was imported, you can connect to MySQL as the database user, and view the tables.
| [webadmin@example ~]$ mysql -uexample_user -p Enter password: Welcome to the MySQL monitor. Commands end with ; or . Your MySQL connection id is 110 Server version: 5.1.57 MySQL Community Server GA (GPL) by eApps.com Hosting Copyright (c) 2000, 2010, Oracle and/or its affiliates. All rights reserved. This software comes with ABSOLUTELY NO WARRANTY. This is free software, and you are welcome to modify and redistribute it under the GPL v2 license Type ‘help;’ or ‘’ for help. Type ‘ to clear the current input statement. mysql> show databases; +--------------------+ | Database | +--------------------+ | information_schema | | example_database | +--------------------+ 2 rows in set (0.00 sec) mysql> use example_database; Reading table information for completion of table and column names You can turn off this feature to get a quicker startup with -A Database changed mysql> show tables; +----------------------------+ | Tables_in_example_database | +----------------------------+ | attachment | | auth_cookie | | component | | enum | | milestone | | ticket | | ticket_change | | ticket_custom | | version | | wiki | +----------------------------+ 10 rows in set (0.00 sec) mysql> |
This should match what you know to be in the SQL file you imported.
Stopping and starting MySQL
MySQL can be stopped/started/restarted from the command line of the Server.
Stopping and starting MySQL using the command line
You can stop, start, and restart MySQL from the command line. To do this, you will need to connect to the Server using SSH, and be able to work as the root user.
Note that the name of the MySQL service is mysqld, not mysql.
Check the status of MySQL
-
For CentOS 6, use the
service mysqld statuscommand:[root@example ~]# service mysqld status
mysqld (pid 1553) is running...
[root@example ~]# -
For CentOS 7, use the
systemctl status mysqldcommand:[root@example ~]# systemctl status mysqld
mysqld (pid 1553) is running...
[root@example ~]#
Stop MySQL
-
For CentOS 6, use the
service mysqld stopcommand:[root@example ~]# service mysqld stop
Stopping MySQL: [ OK ]
[root@example ~]# -
For CentOS 7, use the
systemctl stop mysqldcommand:[root@example ~]# systemctl stop mysqld
Stopping MySQL: [ OK ]
[root@example ~]#
Start MySQL
-
For CentOS 6, use the
service mysqld startcommand:[root@example ~]# service mysqld start
Starting MySQL: [ OK ]
[root@example ~]# -
For CentOS 7, use the
systemctl start mysqldcommand:[root@example ~]# systemctl start mysqld
Starting MySQL: [ OK ]
[root@example ~]#
Restart MySQL
-
For CentOS 6, use the
service mysqld restartcommand:[root@example ~]# service mysqld restart
Stopping MySQL: [ OK ]
Starting MySQL: [ OK ]
[root@example ~]# -
For CentOS 7, use the
systemctl restart mysqldcommand:[root@example ~]# systemctl restart mysqld
Stopping MySQL: [ OK ]
Starting MySQL: [ OK ]
[root@example ~]#
MySQL Configuration
Using a my.cnf file
MySQL uses option or configuration files to read startup options from. On your Server, this file is my.cnf, located in the /etcdirectory.
If you are modifying the default my.cnf file, make sure to read all the appropriate MySQL documentation regarding the settings for that file for your version of MySQL. An incorrectly formatted my.cnf file can cause MySQL to fail on start up, and debugging the my.cnf file is outside of the standard sive.host's support.
The MySQL distribution also provides some my.cnf files as examples if the default file does not meet your needs. These files are located in the /usr/share/mysql directory. The files are my-huge.cnf, my-large.cnf, my-medium.cnf and my-small.cnf. Each file has a description at the top of the file describing the type of system it was designed for. Please read these descriptions carefully and choose the my.cnf file that is appropriate for your needs.
To use one of these files, copy it to your /etc directory, and rename it my.cnf. Edit the file to suit your specific needs, and restart MySQL.
Sample my.cnf configurations
Below are some common configurations seen in my.cnf files. Be aware that these configurations are used to solve very specific problems or issues, and are not generally required to successfully use MySQL.
Also, understand that using a value in a my.cnf file incorrectly, or with the incorrect syntax, can cause MySQL to fail on start up. Use these sample configurations at your own risk!
Add these configurations to the my.cnf file either from via the command line. After adding the configurations, you will need to restart MySQL. If for some reason MySQL fails to start, remove the changes you made to the my.cnf file, and restart MySQL again.
Logging slow queries - at times you might want to log which queries are taking longer than a specified time frame, in order to see what you need to optimize in your MySQL databases. This goes under the general [mysqld] heading. The location of the slow_queries.log is up to you, as is the long_query_time, which is in seconds.
| log-slow-queries=/tmp/slow_queries.log long_query_time=2 |
Case insensitive tables – if for some reason your tables are mixed case (which is not a best practice, and should be avoided whenever possible), this will tell MySQL to accept that the tables are not all in lower case. This also goes under the general [mysqld] heading.
| lower_case_table_names = 1 |
MyISAM tables optimization - the following is taken from the /usr/share/mysql/my-medium.cnf file, and will help optimize MyISAM tables for small to medium sized databases (10K to 20K records). This also goes under the general [mysqld] heading.
| skip-locking key_buffer = 16M max_allowed_packet = 8M table_cache = 64 sort_buffer_size = 512K net_buffer_length = 8K read_buffer_size = 256K read_rnd_buffer_size = 512K myisam_sort_buffer_size = 8M |
InnoDB tables optimization - the following will help to optimize InnoDB tables for small and medium sized database (10K to 20K records). This also goes under the general [mysqld] heading.
| #innodb innodb_buffer_pool_size = 96M innodb_flush_log_at_trx_commit = 1 innodb_additional_mem_pool_size = 2M innodb_log_buffer_size = 2M |
Increasing the idle timeout - by default MySQL drops any idle connections after 8 hours (28800 seconds). This means that your application can have problems connecting to your database if it sits idle for over 8 hours (for example, overnight). This increases the idle timeout to 24 hours (86400 seconds). This also goes under the [mysqld] heading.
| interactive_timeout = 86400 |
MySQL remote access setup
If you need to allow access to MySQL from a remote connection, you will need to create a user that can connect remotely.
|
To MySQL, the users bob@localhost and [email protected] are totally separate users and can have totally separate passwords and privileges, even though they might be the same person. |
To create a user with administrative privileges that can connect from a remote workstation, connect to the command line of the VS, and then connect to MySQL as the root user.
To create a user that can only connect remotely to the MySQL database from the example.com domain, use a command similar to this: GRANT ALL PRIVILEGES ON *.* TO 'bob'@'example.com' IDENTIFIED BY 'bobspasswd' WITH GRANT OPTION;
| [root@isp-manager ~]# mysql -uroot -p Enter password: Welcome to the MySQL monitor. Commands end with ; or . Your MySQL connection id is 4 Server version: 5.1.57 MySQL Community Server GA (GPL) by eApps.com Hosting Copyright (c) 2000, 2010, Oracle and/or its affiliates. All rights reserved. This software comes with ABSOLUTELY NO WARRANTY. This is free software, and you are welcome to modify and redistribute it under the GPL v2 license Type 'help;' or '' for help. Type '' to clear the current input statement. mysql> GRANT ALL PRIVILEGES ON . TO 'bob'@'example.com' IDENTIFIED BY 'bobspasswd' WITH GRANT OPTION; Query OK, 0 rows affected (0.00 sec) mysql> |
To create a user that can connect remotely to the MySQL database from any domain or workstation, use a command similar to this: GRANT ALL PRIVILEGES ON *.* TO 'bob'@'%' IDENTIFIED BY 'bobsotherpassword';
| [root@isp-manager ~]# mysql -uroot -p Enter password: Welcome to the MySQL monitor. Commands end with ; or . Your MySQL connection id is 4 Server version: 5.1.57 MySQL Community Server GA (GPL) by eApps.com Hosting Copyright (c) 2000, 2010, Oracle and/or its affiliates. All rights reserved. This software comes with ABSOLUTELY NO WARRANTY. This is free software, and you are welcome to modify and redistribute it under the GPL v2 license Type 'help;' or '' for help. Type '' to clear the current input statement. mysql> GRANT ALL PRIVILEGES ON . TO 'bob'@'%' IDENTIFIED BY 'bobsotherpassword'; Query OK, 0 rows affected (0.00 sec) mysql> |
Backing up your MySQL databases
MySQL databases can be backed up from the command line, phpPgAdmin.
By default, there are no backups taken of your Server.
 |
You need to take responsibility for backing up your mission critical data! If the data is important to you or your business, making sure you have current backups needs to be one of your top priorities. |
Backing up your databases using phpMyAdmin
The phpMyAdmin program has an Export feature that can be used to backup your databases. You can backup either single databases, or select multiple databases, or all databases.
To begin, login to phpMyAdmin as the root MySQL user. Click on the Export tab.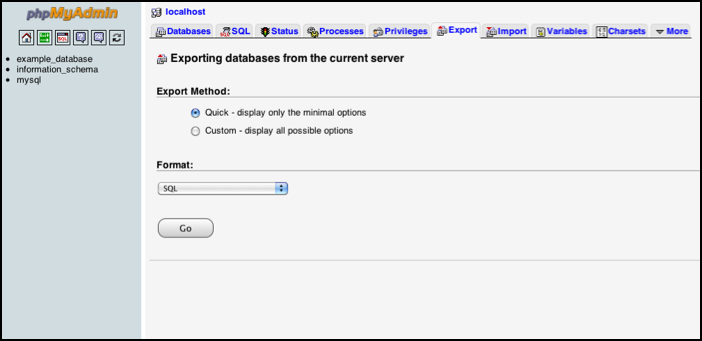
The default option of Quick - display only the minimal options will export all the databases as a file, with Structure and Data. This will download a file to your local computer called localhost.sql.
If you want to set specific options for the export, including which databases to export, click on Custom - display all possible options. This will allow you to set the file name, character set, compression, and the format of the file. Other options are also available.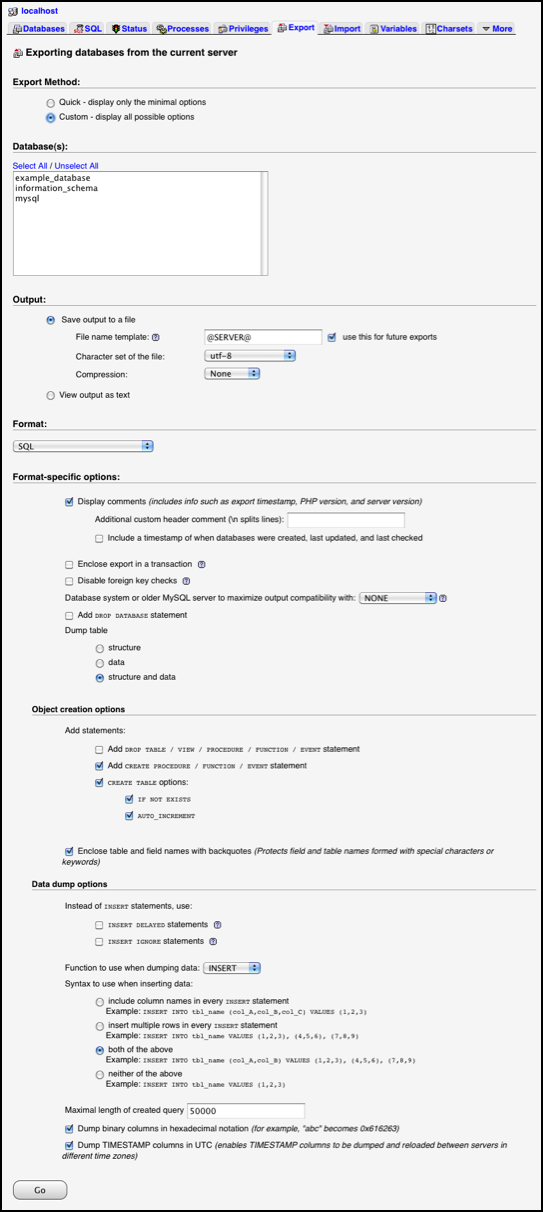
Backing up your databases using mysqldump
To backup your databases using mysqldump, you will need to connect to the command line of the Server. The mysqldump commands will need to be run as the system root user, not as the mysql root user.
Using mysqldump to back up a single database
The mysqldump command can be used to back up a single database. The command to use is mysqldump -p database_name > name_of_backup_file.sql. You can enter the password at the -p prompt in the command string if you wish. This is what you would do if you were scripting the backup, for example.
This will place the backup file in the current working directory. Make sure to not name the backup file with the same name as the database itself.
| [root@isp-manager ~]# mysqldump -p example_database > example_backup.sql Enter password: [root@isp-manager ~]# |
Using mysqldump to back up all databases
The mysqldump command can also be used to make a backup of all databases at once. This is useful if you are going to have to move or backup a large number of databases. The command to use is mysqldump --all-databases -p > databases_file.sql. You can enter the password at the -p prompt in the command string if you wish. This is what you would do if you were scripting the backup, for example.
| [root@example ~]# mysqldump --all-databases -p > databases_file.sql Enter password: [root@example ~]# |
This backs up all databases on the Server.
mysqldump is a complex application, with many options and variables. If you have questions on other uses for mysqldump that are not covered in this User Guide, please reference the official documentation – https://dev.mysql.com/doc/refman/5.0/en/mysqldump.html
