
Securely Connecting To Your Server (SSH and Console)
Overview
All Linux based Servers have command line access available by default. You can connect from an SSH client on your local computer.
Connecting to your Server using an SSH client
SSH Clients
Connecting to your Server using SSH
Using PuTTY (Windows)
Using a Terminal Emulator program (Mac OS X, UNIX/Linux, *BSD)
Using SSH keys
Using SSH keys - Mac OS X/Linux/UNIX
Using SSH keys - Windows
Connecting to your Server using an SSH client
Using an SSH client such as PuTTY (Windows), SecureCRT (Windows, Mac OS X, Linux), Terminal.app (Mac OS X), or an xterm (Linux, Mac OS X), you can connect to the command line of your Virtual Server.
The advantage of an SSH client over a Java and browser-based solution like the Server Console is that a standalone client is not affected by Java or browser version issues, or problems or conflicts with installed browser extensions or plug-ins. If you find yourself working from the command line on a regular basis, you should be using an actual SSH client.
SSH Clients
There are SSH clients available for every major operating system: Windows, Mac OS X, Linux, and *BSD.
Windows SSH Clients
There are several Windows SSH clients, both free and commercial.
-
PuTTY - a popular free and open source SSH client. Download A Windows installer for everything except PuTTYtel to get all the necessary PuTTY files. Basic PuTTY configuration will be covered in the Using PuTTY section of this User Guide.
-
SecureCRT - a popular and full featured commercial SSH client. More information about SecureCRT can be found at https://www.vandyke.com/products/securecrt/index.html.
 |
This is by no means a complete list of Windows SSH clients. You should be able to easily find more clients if one of the above does not meet your needs. |
UNIX SSH Clients (including Mac OS X, Linux and *BSD)
For operating systems based on a UNIX variant, such as Mac OS X, Linux, or one of the *BSD flavors, there is usually an SSH client built into the system in the form of a terminal emulator. There should be no software to install in order to have an SSH client.
For UNIX, Linux and *BSD systems, the type of terminal emulator available will vary depending on the window manager installed. These systems will also have the ability to connect via SSH directly from the console or command line of the operating system.
For Mac OS X systems, the terminal emulator is the Terminal application, which is located in the Applications > Utilities. This is NOT the Console application - use only the Terminal application as an SSH client. Mac OS X users can also purchase SecureCRT, or use the free iTerm2 client.
|
There are quite a few SSH clients available for UNIX, Linux, Mac OS X, and *BSD. If any of the listed clients do not meet your needs, you should be able to find one that does quite easily. |
Connecting to your Server using SSH
Once you have located an SSH client to use, you can connect to your Server using the SSH protocol.
You will need to know the following information:
-
IP Address of the Server - this is found in the IP Addresses tab for that Server, in the Customer Portal.
-
Username and Password - this user must have command line (shell access) to the Server.
Using PuTTY (Windows)
To connect to your Virtual Server using PuTTY, you will need to add the settings for the Server to the PuTTY configuration. More information on configuring PuTTY can be found at the official documentation - PuTTY Documentation Page.
You will need to know the IP address of the Server, and once you are connected via PuTTY you will need to know the username and password for the user.
Using a Terminal Emulator program (Mac OS X, UNIX/Linux, *BSD)
Open the Terminal Emulator program, and at the command prompt enter the following command, making sure to substitute the IP address of your Server for IP_ADDRESS: ssh user@IP_ADDRESS
Login using the correct username and password, and you should be at the command prompt for the Server.
Using SSH keys
If you are a frequent SSH user, you may want to consider using SSH keys so that you are not prompted for a password every time you log in to your Server. This is quite useful if you want to set up some type of automated and unattended connection to the Server, such as a backup script.
If you manage several servers, SSH keys allows you to quickly log in to each server, and helps to avoid the common shortcut of having the same password on each server.
SSH keys are also used by applications such as Git, so that you can commit and clone from a repo without having to enter a password every time.
SSH keys work by using a public and a private key. When you connect via SSH from your local computer to the remote server, the SSH protocol matches the private key and the public key together, and then allows the connection to continue without asking for a password. If the public and private key don't match, or if you are connecting to the remote server from a computer other than your local computer where your SSH private key is located, you will be prompted for a password.
To set this up, you will need to generate an SSH key pair on your local computer. This creates a private key, and a public key. The private key stays on your local machine, and the public key is placed on the remote server that you want to connect to. You can have your public key on any number of remote servers, but you will have only one private key.
Remember to always keep your private key secure. If someone has your private key, they can connect to any remote server where your public key is located without being prompted for a password. Only share your public key.
|
This user guide will cover how to create an SSH key pair from the command line (Mac OS X/Linux/UNIX), and from PuTTY/Pagent on Windows. If you use a different SSH client on Windows, please consult the documentation for that client if you need assistance generating an SSH key pair. |
If you want more information on SSH, there are quite a few resources available online. There are also two books written about SSH: SSH, The Secure Shell: The Definitive Guide, and SSH Mastery: OpenSSH, PuTTY, Tunnels and Keys.
Using SSH keys - Mac OS X/Linux/UNIX
Creating SSH keys - Mac OS X/Linux/UNIX
This example assumes that you do not already have an SSH key pair generated. If you do, these steps will potentially overwrite them. If you have already set up SSH keys on your local computer, skip this step and go to Moving your public key to the remote server
To generate an SSH key pair on Mac OS X, Linux, or UNIX, you will need to work from the command line. Run these commands as a normal user, not as the root user. If you need to work as root on the remote server, log in as a normal user using your SSH keys, and then switch users to root.
To generate the SSH key pair, use the ssh-keygen -t rsa command. If the directory for the SSH keys (.ssh) does not already exist, this command will create it.
This example is from CentOS Linux. Your output may be slightly different on Mac OS X or a different Linux/UNIX OS, but the command and the end result are the same.
At the prompt for Enter file in which to save the key, just hit enter.
When asked for a passphrase, just hit enter.
| -local_computer$ ssh-keygen -t rsa Generating public/private rsa key pair. Enter file in which to save the key (/var/www/test_user/data/.ssh/id_rsa): Created directory '/var/www/test_user/data/.ssh'. Enter passphrase (empty for no passphrase): Enter same passphrase again: Your identification has been saved in /var/www/test_user/data/.ssh/id_rsa. Your public key has been saved in /var/www/test_user/data/.ssh/id_rsa.pub. The key fingerprint is: d6:70:53:9a:8c:12:23:a0:2b:4c:c9:b9:f2:0b:7b:70 [email protected] The key's randomart image is: +--[ RSA 2048]----+ | ... o . | |..o . o o + | |.= . o * | |o.. . + . | |+o S . | |+.E . | |.o. | | o.. | |... | +-----------------+ -local_computer$ |
Change directories to the .ssh directory, and list the files.
| -local_computer$ cd .ssh/ -local_computer$ ll total 8 -rw------- 1 test_user test_user 1675 Jul 10 10:37 id_rsa -rw-r--r-- 1 test_user test_user 417 Jul 10 10:37 id_rsa.pub -local_computer$ |
There are two files for the SSH key pair - id_rsa and id_rsa.pub.
-
id_rsa - this is your private key. Keep this key private! Do not share this key with anyone! Note that the permissions are 600 on the file, do not change these.
-
id_rsa.pub - this is your public key. This key can be shared, this is the key that you will place on any remote servers where you wish to connect to using SSH with out having to enter a password.
Moving your public key to the remote server - Mac OS X/Linux/UNIX
Once you have generated your SSH key pair, you can place your public key (id_rsa.pub) on any remote server that you have SSH access to. You can also give the public key to the system administrator of a server where you need to connect to in order to use an application like Git.
In this example, you are placing your public key on your Virtual Server, named webhost.vm-host.net. Your user on that Server is webmaster, and your home directory is /var/www/webmaster/data. Remember that this is just an example, you will need to substitute your actual Server, user, and home directory accordingly. If you have a VPS or a Server using the Webmin Control Panel, your home directory would be /home/username.
Note that your username on your local computer and your username on the remote server do not have to be the same. The SSH protocol is looking to see if the private and public keys match, it is not looking at the usernames.
First, log in to the remote server as your user. Once you are logged in, see if a .ssh directory already exists. Note that the directory is .ssh, not ssh. You will need to use the -a switch to your ls or ll command to see this directory.
If the directory does not exist, create it with the mkdir .ssh command. Once you've created the directory, you will need to create the authorized_keys file where your public SSH key will be. Do this with the touch .ssh/authorized_keys command. And then change the permissions on the authorized_keys file with the chmod 600 .ssh/authorized_keys command.
| -local_computer$ ssh [email protected] [email protected]'s password: -bash-4.1$ pwd /var/www/webmaster/data -bash-4.1$ ll -a total 8 drwxr-x--x 2 webmaster webmaster 4096 Nov 15 2011 . dr-x-----x 3 webmaster mgrsecure 4096 Jul 10 11:39 .. -bash-4.1$ mkdir .ssh -bash-4.1$ touch .ssh/authorized_keys -bash-4.1$ chmod 600 .ssh/authorized_keys -bash-4.1$ |
Once you have set up the directory and file, you can copy your public key to the Server. Do this with scp from the command line. You can also use an application like FileZilla, which can work as an SCP client.
The full command syntax to use is scp -r file_name user@hostname:/path/to/location
For this example, the command would be scp -r id_rsa.pub [email protected]:/var/www/webmaster/data/.ssh
This will copy the public key from the .ssh directory to the .ssh directory on the VS, as the webmaster user. Remember to substitute your own details as needed.
| -local_computer$ scp -r id_rsa.pub [email protected]:/var/www/webmaster/data/.ssh [email protected]'s password: id_rsa.pub 100% 420 0.4KB/s 00:00 -local_computer$ |
Next, connect to the Server using SSH, and move the public key into the authorized_keys directory. Remember to connect as your normal user, not as the root user.
To move the public key into the authorized_key file, use the cat id_rsa.pub >> authorized_keys command. Note the two greater than symbols (>>) - this appends the key to the file, instead of overwriting anything that might already be in the file.
| -local_computer$ ssh [email protected] [email protected]'s password: Last login: Tue Jul 10 12:31:55 2012 from 10.0.7.66 -bash-4.1$ pwd /var/www/webmaster/data -bash-4.1$ cd .ssh/ -bash-4.1$ ll total 4 -rw------- 1 webmaster webmaster 0 Jul 10 11:53 authorized_keys -rw-r--r-- 1 webmaster webmaster 420 Jul 10 12:40 id_rsa.pub -bash-4.1$ cat id_rsa.pub >> authorized_keys -bash-4.1$ ll total 8 -rw------- 1 webmaster webmaster 420 Jul 10 13:06 authorized_keys -rw-r--r-- 1 webmaster webmaster 420 Jul 10 12:40 id_rsa.pub -bash-4.1$ |
Connecting to the remote server - Mac OS X/Linux/UNIX
To test, open a new SSH terminal window, and try to connect to the Server using SSH. It is important that you leave your existing connection open and connected - if you did something wrong, and your test fails, you may find yourself locked out of the Server as that user.
| -local_computer$ ssh [email protected] Last login: Tue Jul 10 13:05:52 2012 from 10.0.7.66 -bash-4.1$ |
Notice how there was no password prompt. This is because the SSH protocol compared the public and private keys, found that they matched, and allowed the connection. If the keys had not matched, you would have been prompted for a password before being allowed to log in.
Using SSH keys - Windows
These examples use PuTTY, a free SSH client for Windows. If you use a different SSH client, you will need to consult the documentation for that client to find out how to generate and use SSH keys.
Creating SSH keys on Windows with PuTTY Key Generator (PuTTYgen)
To generate an SSH key pair on Windows, go to Start > All Programs > PuTTY > PuTTYgen
This opens the PuTTY Key Generator.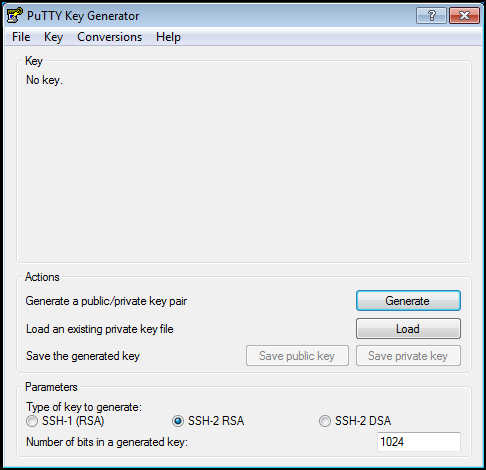
Under the Actions menu you will see Generate a public/private key pair. Click on the Generate button to the right of that.
You will be asked to move the mouse around in the application window in order to generate some randomness to use for the key. Do this until the green bar fills up.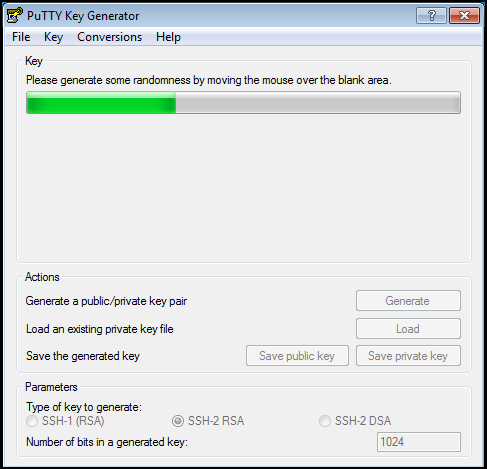
Once the key is generated, the screen will show you the generated public key, and allow you to save the public and private keys.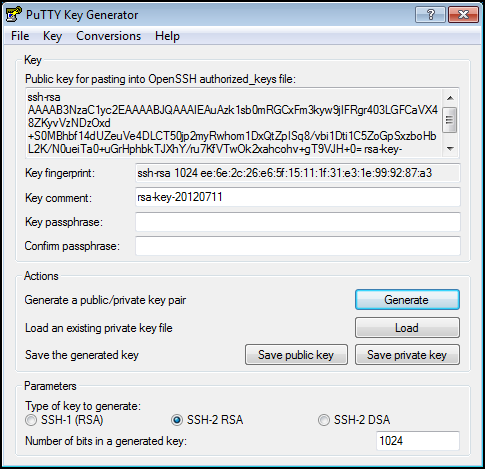
To save the public key, copy and paste the public key from the section titled Public key for pasting into OpenSSH authorized_keys fileinto a file called id_rsa.pub, and save this file into your Documents folder. DO NOT USE the Save public key option - this saves the file in a format that is not compatible with your system.
For the private key, the Save private key function works correctly. You will be asked if you want to save the key without a passphrase, click on Yes.
You will be presented with a dialog box where you can name the file and the location. PuTTY saves private keys as a file type of PuTTY Private Key Files (.ppk)* - do not change the file type.
Moving your public key to the remote server - Windows
Once you have generated your SSH key pair, you can place your public key (id_rsa.pub) on any remote server that you have SSH access to. You can also give the public key to the system administrator of a server where you need to connect to in order to use an application like Git.
In this example, you are placing your public key on your Virtual Server, named webhost.vm-host.net. Your user on that VS is webmaster, and your home directory is /var/www/webmaster/data. Remember that this is just an example, you will need to substitute your actual VS, user, and home directory accordingly. If you have a VPS or a VS using the Webmin Control Panel, your home directory would be /home/username.
Note that your username on your local computer and your username on the remote server do not have to be the same. The SSH protocol is looking to see if the private and public keys match, it is not looking at the usernames.
First, log in to the remote server as your user. Once you are logged in, see if a .ssh directory already exists. Note that the directory is .ssh, not ssh. You will need to use the -a switch to your ls or ll command to see this directory.
If the directory does not exist, create it with the mkdir .ssh command. Once you've created the directory, you will need to create the authorized_keys file where your public SSH key will be. Do this with the touch .ssh/authorized_keys command. And then change the permissions on the authorized_keys file with the chmod 600 .ssh/authorized_keys command.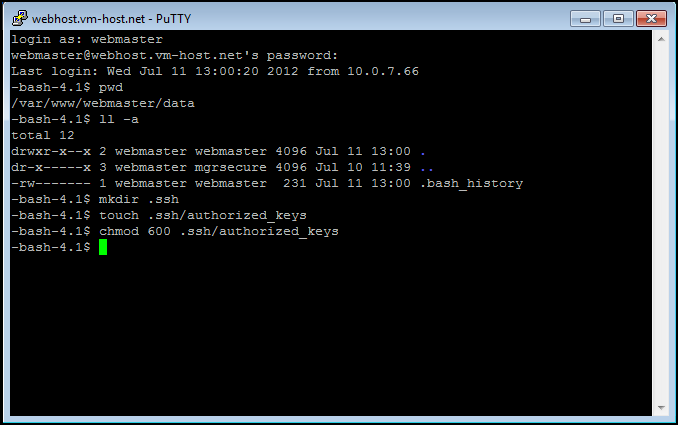
Once you have set up the directory and file, you can copy your public key to the Virtual Server. To do this, use the PSFTP program, which is the PuTTY SFTP client. You can also use an application like FileZilla, which also works as an SFTP client.
Go to Start > All Programs > PuTTY > PSFTP. When the program opens, you will see a window that looks like this.
To connect to the Server, use this syntax: open user@hostname
For this example, the command would be open [email protected]
This will log you in as the webmaster user, to the home directory. Once you've connected, change directories to the .ssh directory with the cd .ssh command.
Once you have connected to the Server, and changed to the .ssh directory, you can use the put command to move the SSH public key to the VS. You will need to know the absolute path to the public key on your Windows computer. The syntax is *put
For this example, if the public key was located in your user's Documents folder, you would use put C:_name_rsa.pub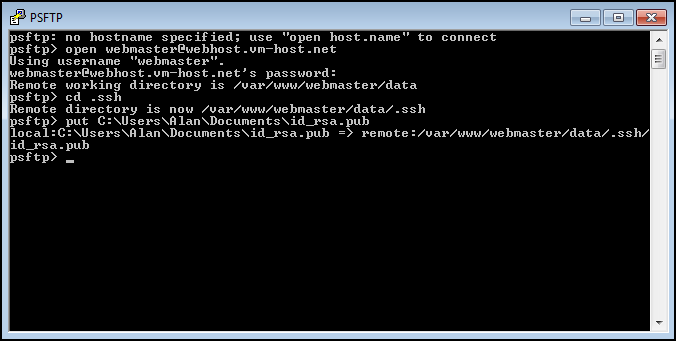
Once you have moved the public key to the Server, you can exit PSFTP with the quit command. Once you have done that, you will need to move the public key into the authorized_keys file. If necessary, reconnect to the VS with PuTTY, and change to the .ssh directory.
To move the public key into the authorized_keys file, use the cat id_rsa.pub >> authorized_keys command. Note the two greater than symbols (>>) - this appends the key to the file, instead of overwriting anything that might already be in the file.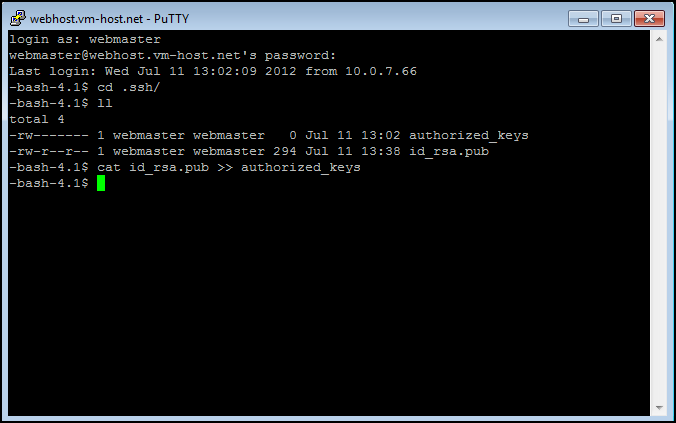
Connecting to the remote server - Windows
To test the connection to the remote server, you will need to exit your current PuTTY session, start Pagent, and then reconnect using PuTTY.
To start Pagent, go to Start > All Programs > PuTTY > Pagent
When Pagent starts, it puts an icon in the Notification Area of the Taskbar, which is circled in blue in this screenshot.
Double click on the icon to open the Pagent Key List window.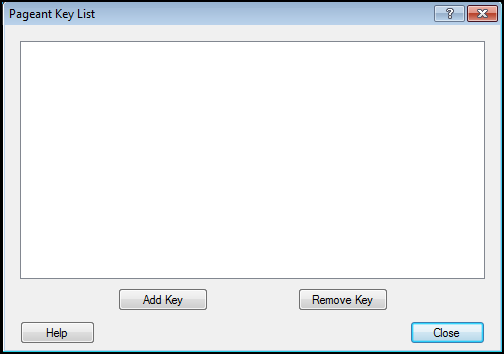
Click on Add Key. This will open a file browser, and you can browse for the .ppk file that you created from the private key.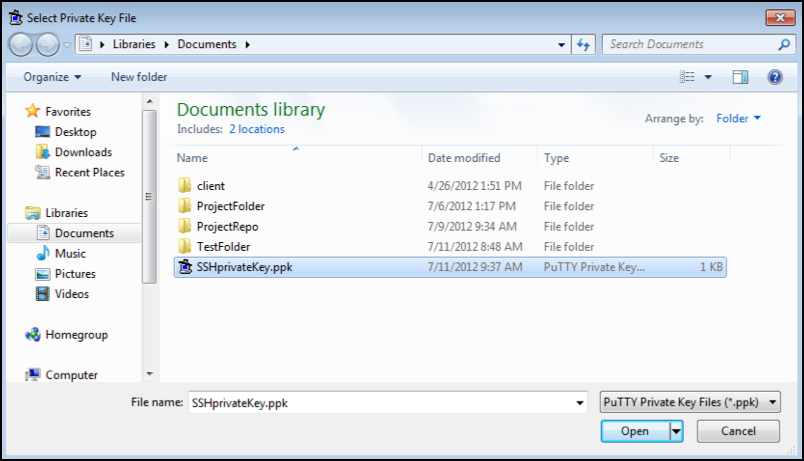
Once you find the file, click on it to highlight it, and click on Open.
This adds the private key to Pagent (note that only the key fingerprint is being shown, not the actual key itself).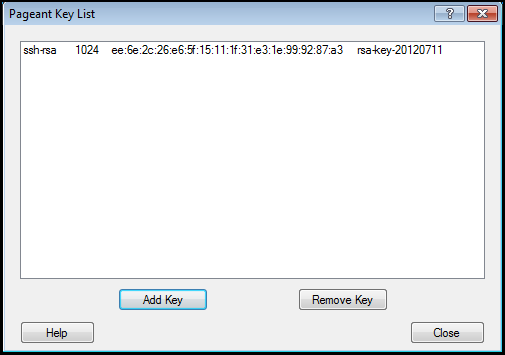
Once the key is loaded, reconnect to the Server from PuTTY. With Pagent running, PuTTY will use SSH to match the public and private keys, and log you in without a password.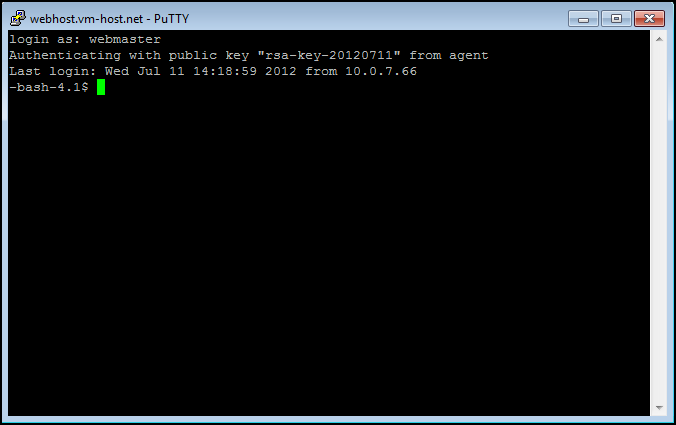
If the public and private keys do not match, or your are connecting from a different computer, you will have to enter a password to log in.
