
You’ve setup a new system, or installed something new on your Linux system and its not working. You get the feeling that SELinux is the cause of the problem. This page was written to help.
Overview
SELinux has two major components on your system. There’s the kernel mechanism which is enforcing a bunch of access rules which apply to processes and files. And secondly, there’s file labels : every file on your system has extra labels attached to it which tie-in with those access rules. Run ls -Z and you’ll see what I mean.
Should you really disable SELinux?
Be aware that by disabling SELinux you will be removing a security mechanism on your system. Think about this carefully, and if your system is on the Internet and accessed by the public, then think about it some more.
You need to decide if you want to disable SELinux temporarily to test the problem, or permanently switch it off. It may also be a better option to make changes to the policy to permit the operations that are being blocked – but this requires knowledge of writing policies and may be a steep learning curve for some people. For the operating system as a whole, there is two kinds of disabling:
- Permissive – switch the SELinux kernel into a mode where every operation is allowed. Operations that would be denied are allowed and a message is logged identifying that it would be denied. The mechanism that defines labels for files which are being created/changed is still active.
- Disabled – SELinux is completely switched off in the kernel. This allows all operations to be permitted, and also disables the process which decides what to label files & processes with.
Disabling SELinux could lead to problems if you want to re-enable it again later. When the system runs with file labelling disable it will create files with no label – which could cause problems if the system is booted into Enforcement mode. A full re-labelling of the file system will be necessary.
Temporarily switch off enforcement
You can switch the system into permissive mode with the following command:
echo 0 >/selinux/enforce
You’ll need to be logged in as root, and in the sysadm_r role:
newrole -r sysadm_r
To switch back into enforcing mode:
echo 1 >/selinux/enforce
In Fedora Core and RedHat Enterprise Linux you can use the setenforce command with a 0 or 1 option to set permissive or enforcing mode, its just a slightly easier command than the above.
To check what mode the system is in:
cat /selinux/enforce
which will print a “0” or “1” for permissive or enforcing – probably printed at the beginning of the line of the command prompt.
Permanently Permissive
The above will switch off enforcement temporarily – until you reboot the system. If you want the system to always start in permissive mode, then here is how you do it.
In Fedora Core and RedHat Enterprise, edit /etc/selinux/config and you will see some lines like this:
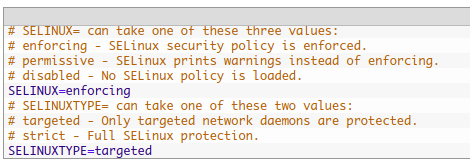
… just change SELINUX=enforcing to SELINUX=permissive, and you’re done. Reboot if you want to prove it.
For the other Linuxes which don’t have the /etc/selinux/config file, you just need to edit the kernel boot line, usually in /boot/grub/grub.conf if you’re using the GRUB boot loader. On the kernel line, add enforcing=0 at the end. For example,

Fully Disabling SELinux
Fully disabling SELinux goes one step further than just switching into permissive mode. Disabling will completely disable all SELinux functions including file and process labelling.
In Fedora Core and RedHat Enterprise, edit /etc/selinux/config and change the SELINUX line to SELINUX=disabled: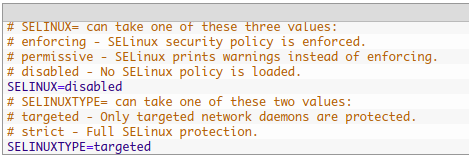
… and then reboot the system.
For the other Linuxes which don’t have the /etc/selinux/config file, you just need to edit the kernel boot line, usually in /boot/grub/grub.conf, if you’re using the GRUB boot loader. On the kernel line, add selinux=0 at the end. For example,
You will have to reboot to disable SELinux, you just can’t do it while the system is running.
Re-Enabling SELinux
If you’ve disabled SELinux as in the section above, and you want to enable it again then you’ve got a bit of work to do. The problem will be that files created or changed when SELinux was disabled won’t have the correct file labels on them – if you just reboot in enforcing mode then a lot of stuff won’t work properly.
What you need to do is to enable SELinux by editing /etc/selinux/config (for Fedora/RedHat) or by adding selinux=1 to the kernel boot line, then boot into permissive mode, then relabel everything, and then reboot into (or simply switch to) enforcing mode.
After booting into permissive mode, run fixfiles relabel
Alternatively, in Fedora and RedHat Enterprise Linux you can run touch /.autorelabel and reboot or put autorelabel on the boot command line – in both cases the file system gets a full relabel early in the boot process. Note that this can take quite some time for systems with a large number of files.
After relabelling the filesystem, you can switch to enforcing mode (see above) and your system should be fully enforcing again.
