This article describes how to use the virus scanner in cPanel to scan your account files for viruses, trojan horses, and other types of malware. You can scan e-mail files, files in public web and FTP directories, or your entire account.
WHAT THE VIRUS SCANNER LOOKS FOR
The virus scanner in cPanel searches for viruses, trojan horses, malware, and other threats. It does this by using databases from several sources:
- ClamAV: Clam AntiVirus is an open-source program that can detect a wide variety of threats. For more information about ClamAV, please visit https://www.clamav.net.
- R-fx Networks: This virus definitions database is designed for shared hosting environments. For more information about the R-fx Networks Linux Malware Detect project, please visit https://www.rfxn.com/projects/linux-malware-detect.
- sive.host's custom virus definitions database: This database includes viruses that we have detected previously on actual systems.
RUNNING A VIRUS SCAN
To run a virus scan, follow these steps:
- Log in to cPanel.
If you do not know how to log in to your cPanel account, please see this article.

- In the ADVANCED section of the cPanel home screen, click Virus Scanner:

-
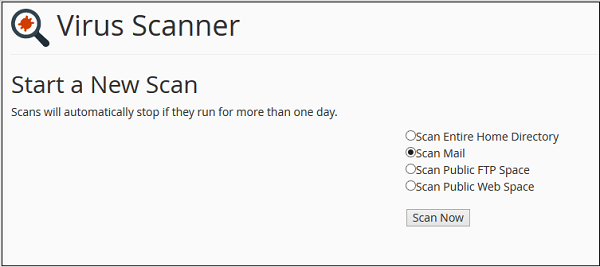
Under Start a New Scan, select the directory you want to scan:

- Scan Mail: This option scans the mail directory in your account, looking for viruses in incoming and outgoing e-mail messages.
You should run this scan if one of your recipients reports receiving a virus from you.
- Scan Entire Home Directory: This option scans all of the files in your account.
- Scan Public Web Space: This option scans the public_html directory in your account, looking for infected web site files.
You should run this scan frequently to check if any of your web site files are infected with known viruses.
- Scan Public FTP Space: This option scans the public_ftp directory in your account, looking for infected files.
You only need to run this scan if you share files using FTP.
- Scan Mail: This option scans the mail directory in your account, looking for viruses in incoming and outgoing e-mail messages.
-
Click .
If there are a lot of files in the directory, the scan may take some time to complete. -
If the virus scan finds any infected files, you can specify what to do with the files:
- Quarantine: When this option is selected, the virus scanner moves the file to the quarantine directory. The quarantine directory is located at /home/username/quarantine_clamavconnector, where username represents your account username.
- Destroy: When this option is selected, the virus scanner deletes the infected file.
- Ignore: When this option is selected, the virus scanner leaves the infected file unchanged.
To complete the virus scan process, click .
-
Under Start a New Scan, select the directory you want to scan:
- Scan Mail: This option scans the mail directory in your account, looking for viruses in incoming and outgoing e-mail messages.
You should run this scan if one of your recipients reports receiving a virus from you.
- Scan Entire Home Directory: This option scans all of the files in your account.
- Scan Public Web Space: This option scans the public_html directory in your account, looking for infected web site files.
You should run this scan frequently to check if any of your web site files are infected with known viruses.
- Scan Public FTP Space: This option scans the public_ftp directory in your account, looking for infected files.
You only need to run this scan if you share files using FTP.
- Scan Mail: This option scans the mail directory in your account, looking for viruses in incoming and outgoing e-mail messages.
-
Click .
If there are a lot of files in the directory, the scan may take some time to complete. -
If the virus scan finds any infected files, you can specify what to do with the files:
- Quarantine: When this option is selected, the virus scanner moves the file to the quarantine directory. The quarantine directory is located at /home/username/quarantine_clamavconnector, where username represents your account username.
- Destroy: When this option is selected, the virus scanner deletes the infected file.
- Ignore: When this option is selected, the virus scanner leaves the infected file unchanged.
To complete the virus scan process, click .


